Stripe
ShipAny integrates Stripe as a payment service provider, allowing you to access it with simple configuration.
Integrate Stripe Payment
Follow these steps to integrate Stripe payment for your project.
Refer to the Stripe Merchant Onboarding Guide to activate a Stripe merchant account.
You can activate a Stripe merchant account as an individual or a business, bind your withdrawal account, and set up basic merchant information.
Enter your merchant page in the Stripe dashboard, and select Developers -> API keys -> Standard keys -> Create secret key to create an API key.
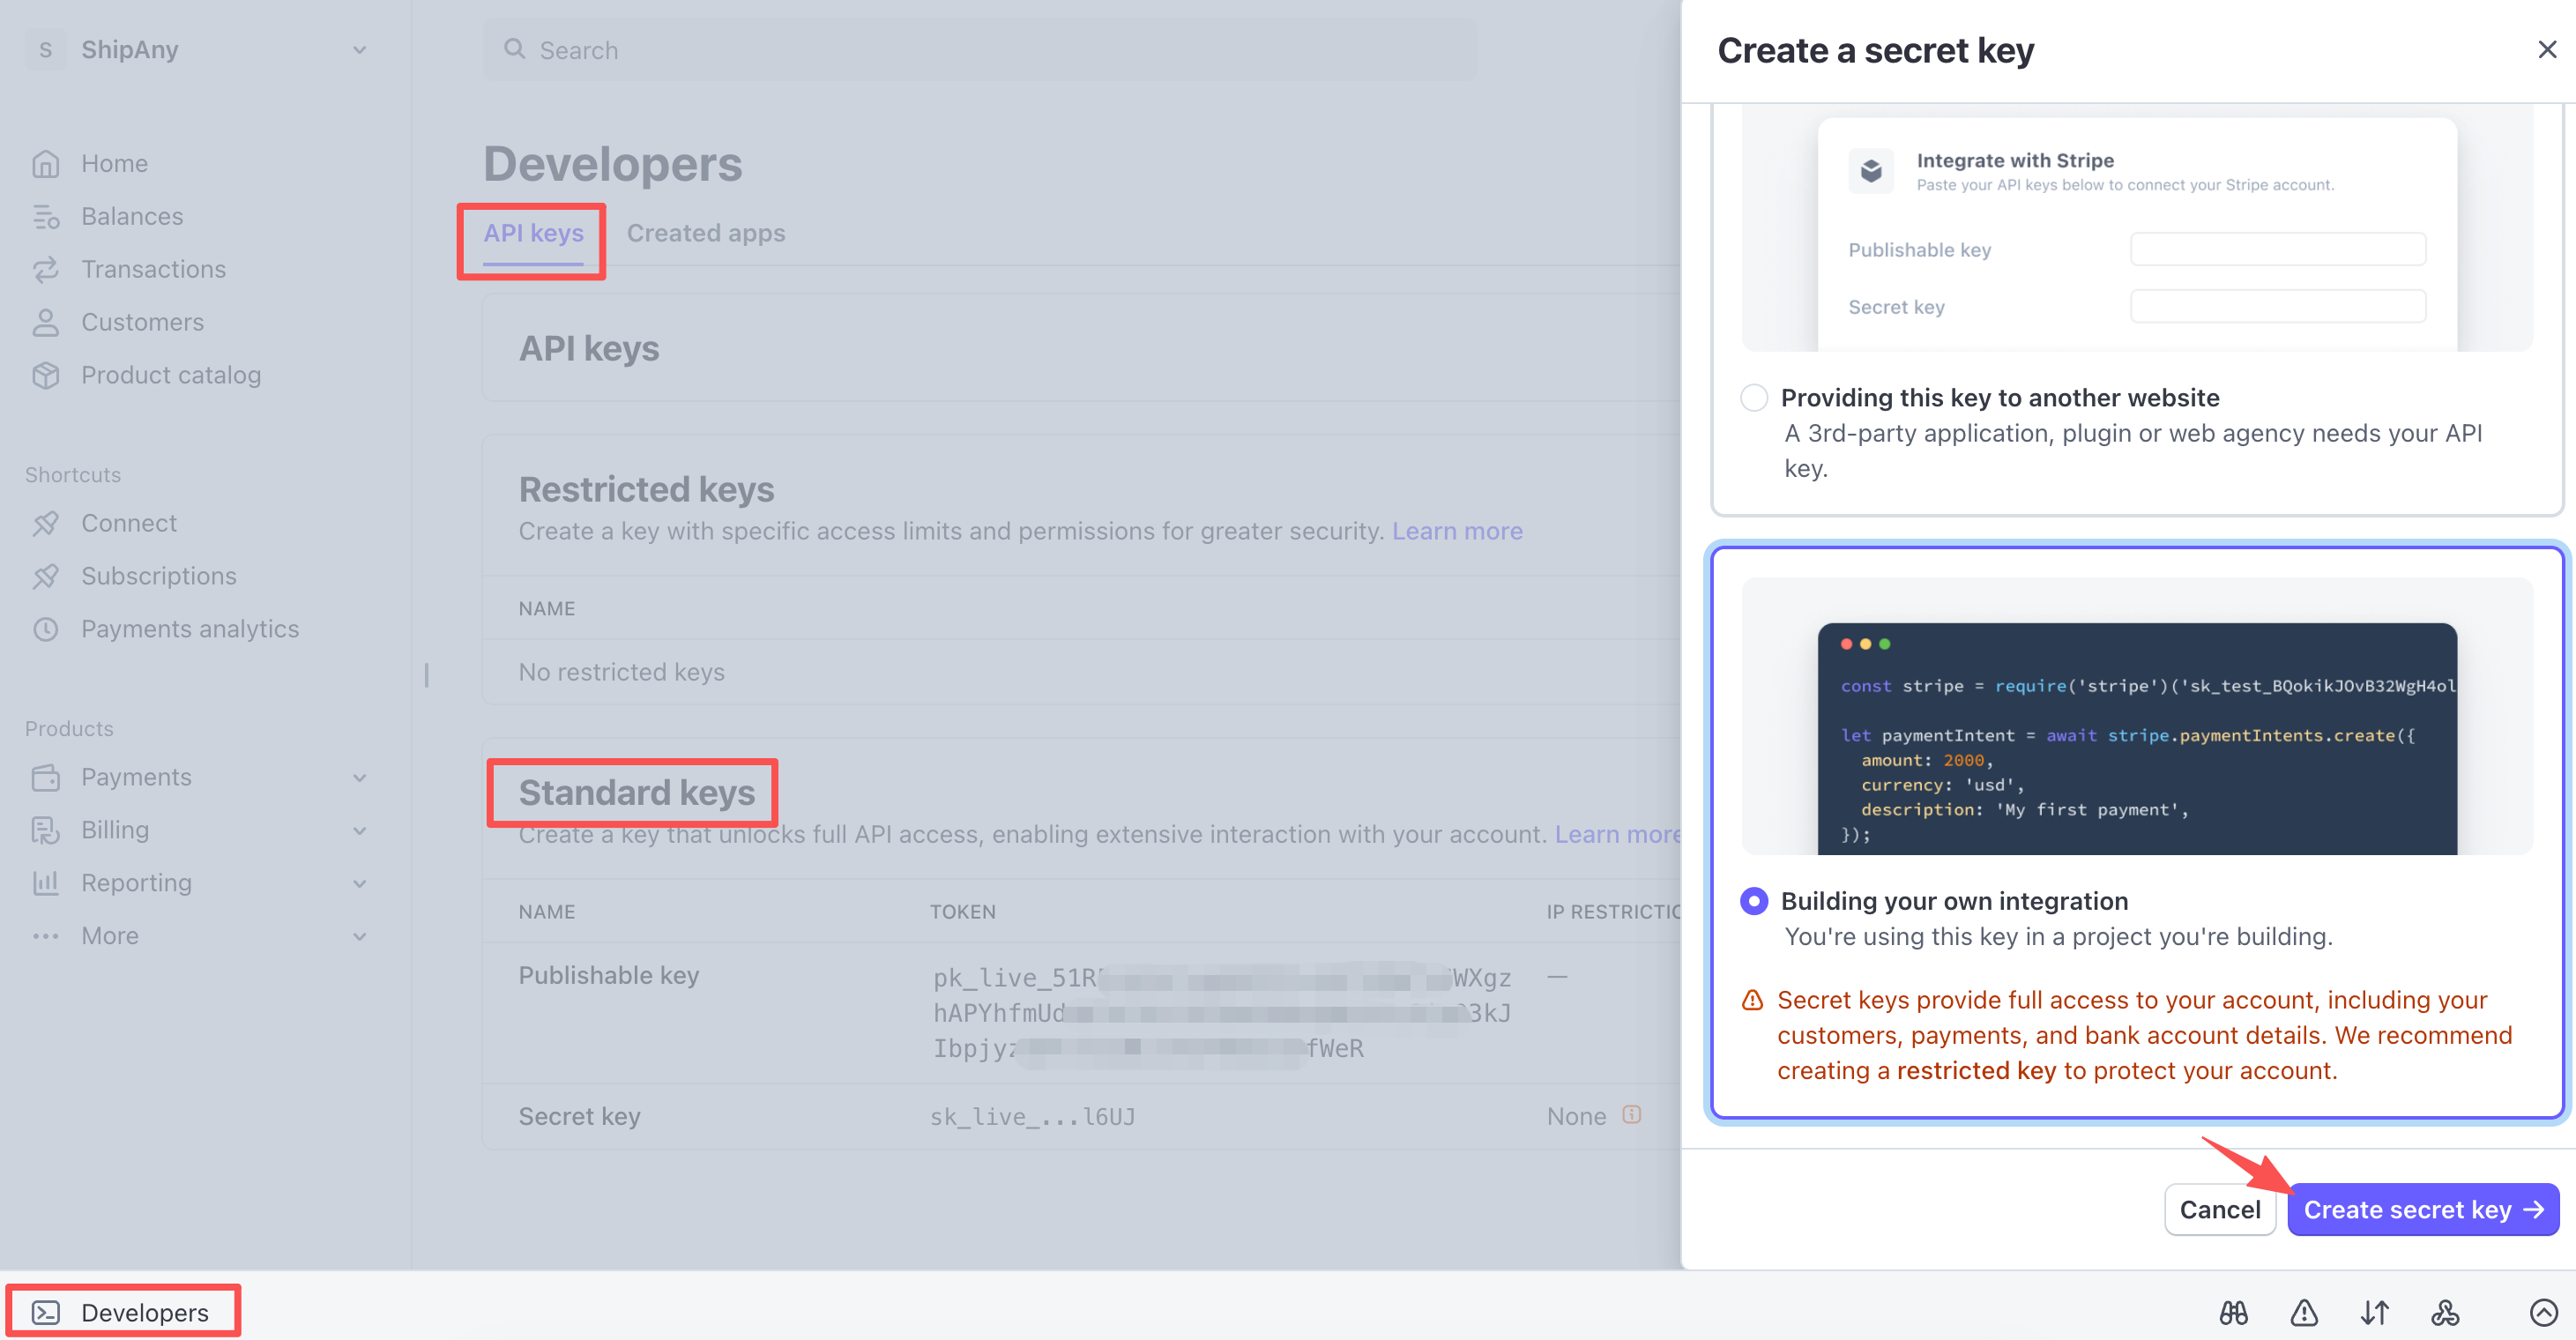
Copy the Publishable key and Secret key.
Note: The
Secret keycan only be copied when it is created. It is sensitive information, so please prevent it from being leaked.
You can switch to the test environment by clicking Switch to sandbox -> Test mode in the upper left corner of the Stripe console to create API keys for testing.
In the project management dashboard, go to the Settings -> Payment -> Stripe panel, and enter the Publishable key and Secret key obtained in the previous step into the Stripe Publishable Key and Stripe Secret Key fields respectively.
Stripe Signing Secret is the signing key for verifying payment notifications. You can leave it blank for now and fill it in after configuring payment notifications in subsequent steps.

Note: During local development, you can fill in the test API key set in the previous step. When deploying online, fill in the official API key.
Visit the /pricing page of the project, view the default pricing table, select a pricing plan, and click the order button.
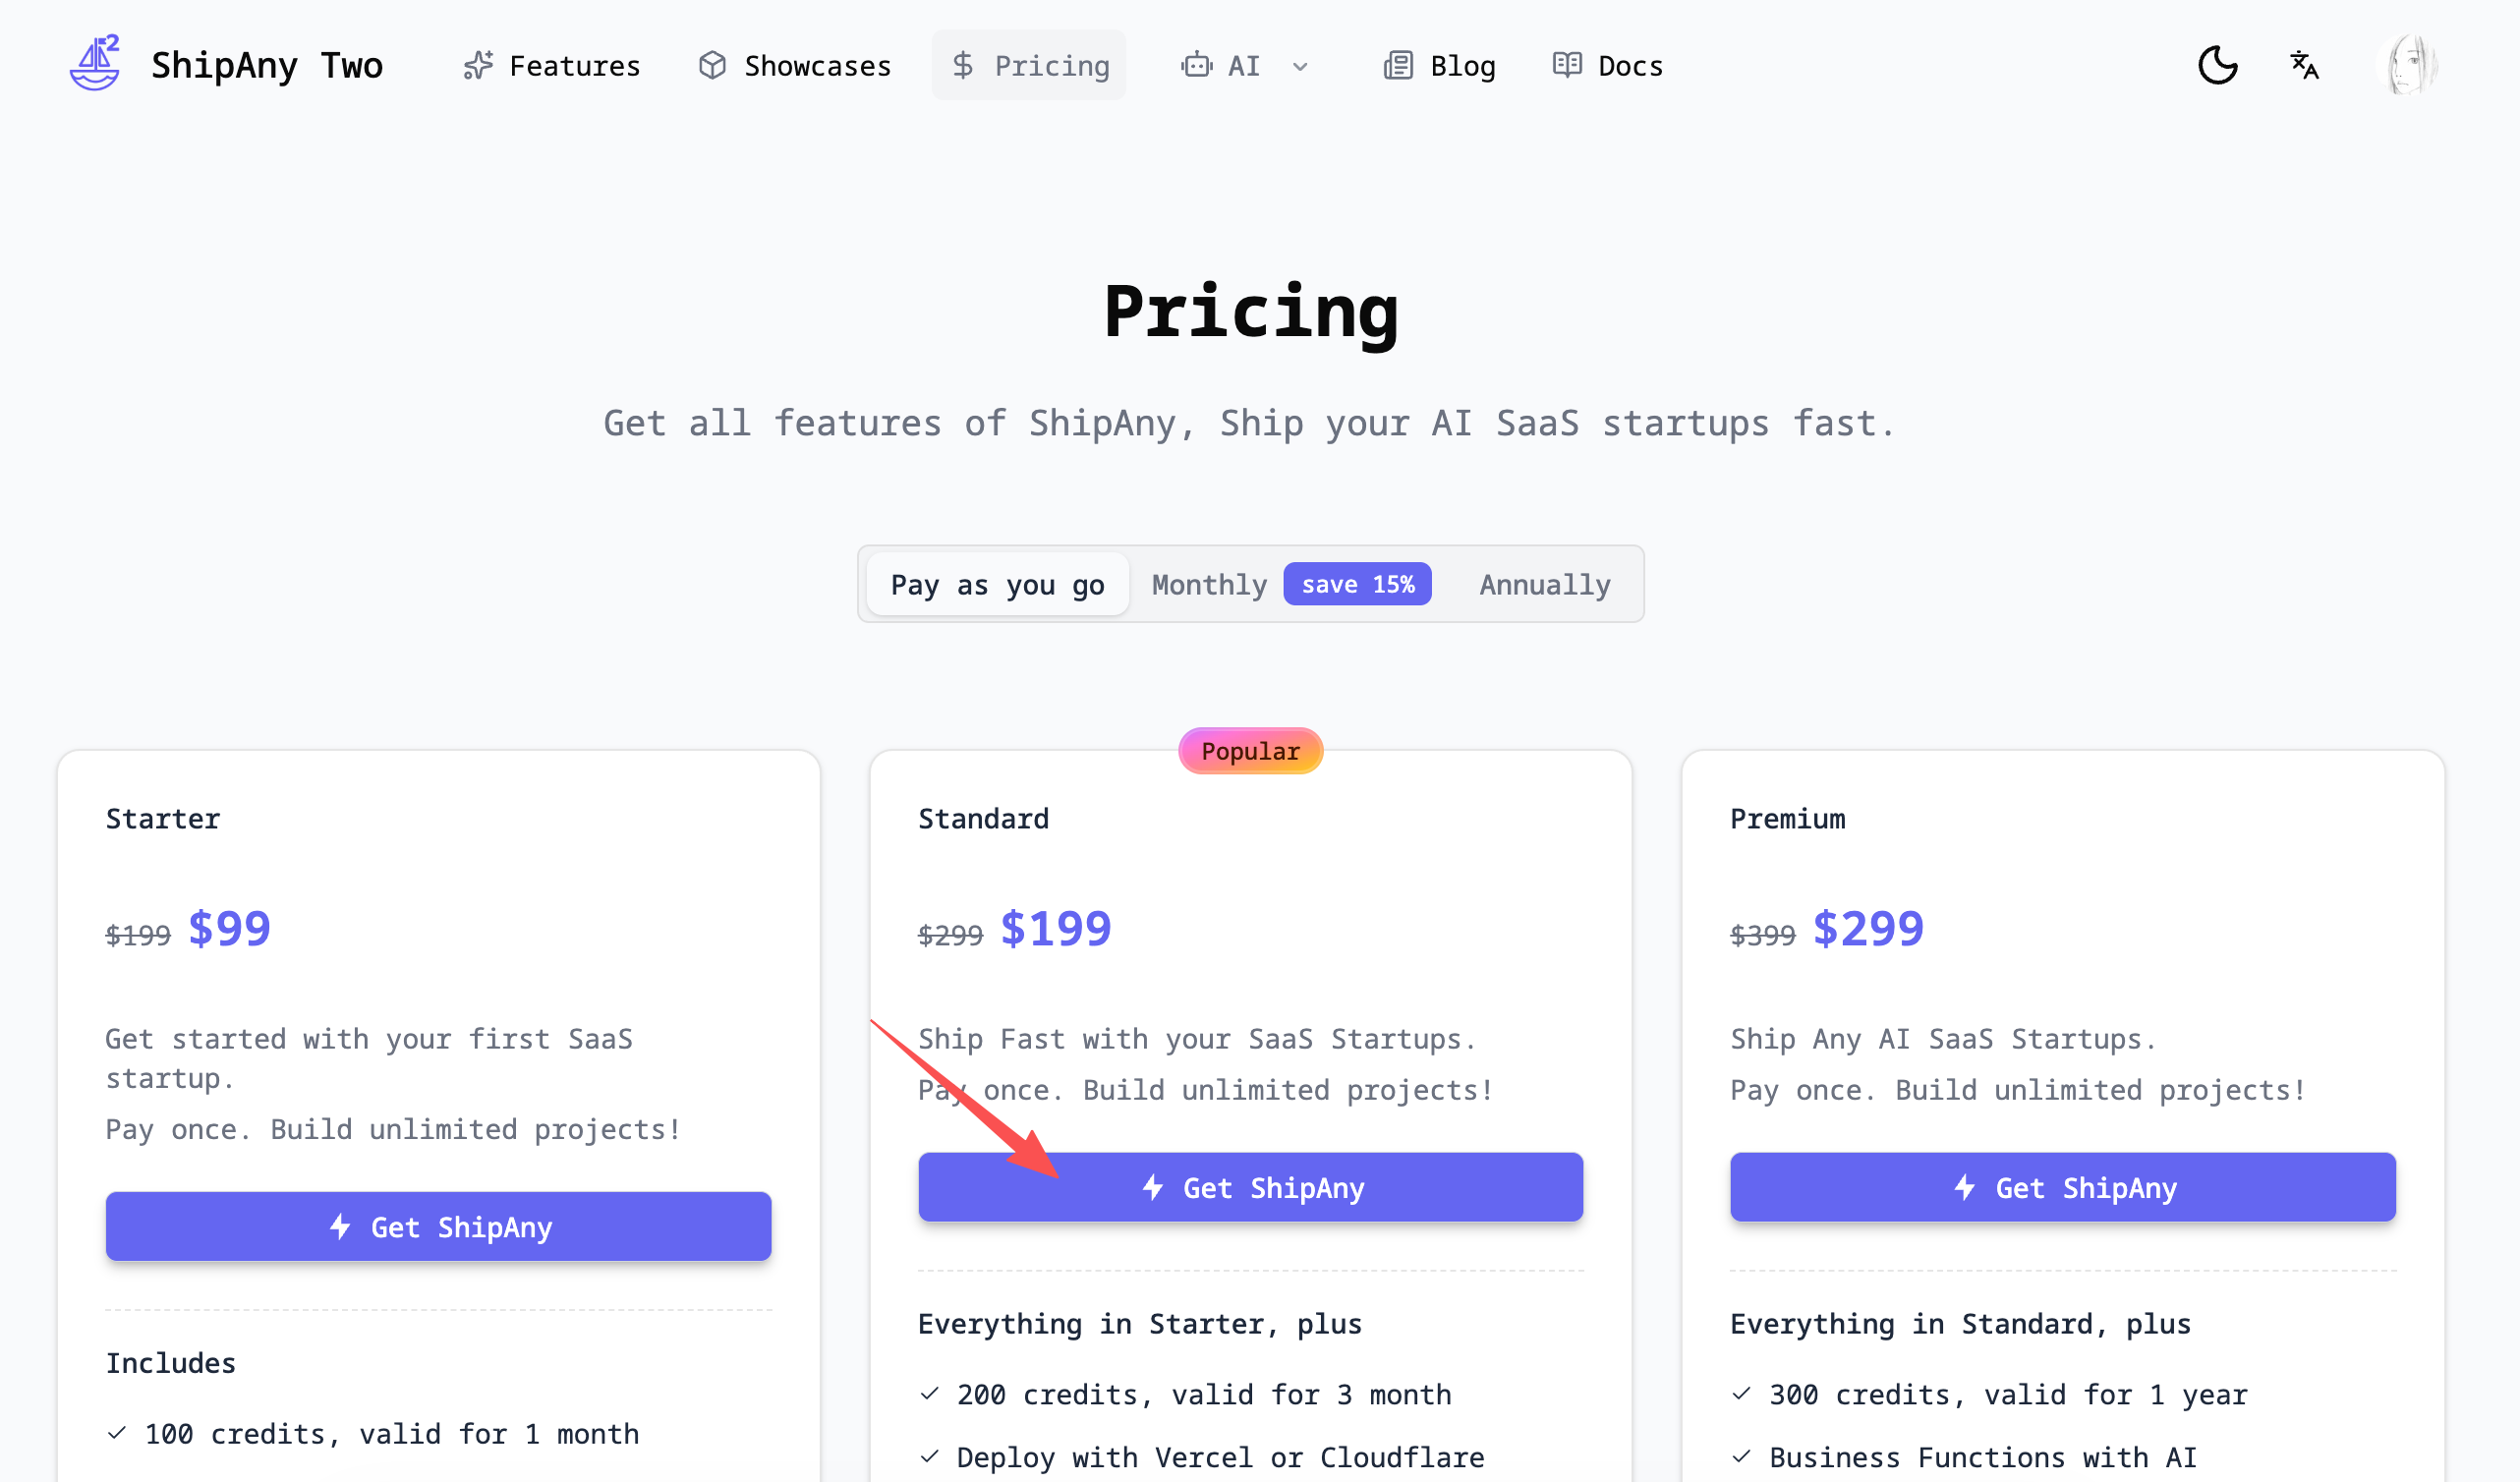
If you can jump to the Stripe payment page normally, the payment configuration is successful.
If you filled in the test API key in the previous step, you can copy a Stripe test card number for payment verification.
Design Pricing Table
The default pricing table is configured in the src/config/locale/messages/{locale}/pages/pricing.json file, which supports multiple languages. Each locale corresponds to an independent pricing table configuration.
The pricing.groups field defines the pricing plan groups, with default values as follows:
{
  "pricing": {
    "groups": [
      {
        "name": "one-time",
        "title": "Pay as you go"
      },
      {
        "name": "monthly",
        "title": "Monthly",
        "is_featured": true,
        "label": "save 15%"
      },
      {
        "name": "yearly",
        "title": "Annually"
      }
    ]
  }
}name: The unique identifier of the group. Inpricing.items, each pricing plan is associated with the groupnamethrough thegroupfield.title: The display name of the group.is_featured: Whether it is a recommended group. Iftrue, this group and the recommended pricing plans it contains will be displayed by default.label: The label of the group. It is displayed as a badge in the upper right corner of the display name.
The pricing.items field defines the list of pricing plans. The data structure of one of the default pricing plans is as follows:
{
  "pricing": {
    "items": [
      {
        "title": "Starter",
        "description": "Get started with your first SaaS startup.",
        "features_title": "Includes",
        "features": [
          "100 credits, valid for 1 month",
          "NextJS boilerplate",
          "SEO-friendly structure",
          "Payment with Stripe",
          "Data storage with Supabase",
          "Google Oauth & One-Tap Login",
          "i18n support"
        ],
        "interval": "one-time",
        "amount": 9900,
        "currency": "USD",
        "price": "$99",
        "original_price": "$199",
        "unit": "",
        "is_featured": false,
        "tip": "Pay once. Build unlimited projects!",
        "button": {
          "title": "Get ShipAny",
          "url": "/#pricing",
          "icon": "RiFlashlightFill"
        },
        "product_id": "starter",
        "product_name": "ShipAny Boilerplate Starter",
        "credits": 100,
        "valid_days": 30,
        "group": "one-time"
      }
    ]
  }
}title: Pricing plan title.description: Pricing plan description.features_title: Pricing plan feature list title.features: Pricing plan feature list.interval: Pricing plan billing cycle. Possible values areone-time(one-time payment),month(monthly subscription),year(annual subscription).amount: Pricing plan amount. This value is used to request a Stripe order, unit: cents.currency: Pricing plan currency. Possible values areUSD(US Dollar),CNY(Chinese Yuan), etc.price: The displayed selling price of the pricing plan.original_price: The displayed original price of the pricing plan. With strikethrough effect.unit: The displayed unit of the pricing plan. Such as/ month,/ year, etc.is_featured: Whether it is a recommended pricing plan. If set totrue, it will be displayed by default in the pricing table.tip: Order tip.button: Order button. You can customize the display texttitleand iconicon.urlis currently a placeholder and has no actual effect.product_id: Unique identifier of the pricing plan. The backend interface locates the pricing plan based on this parameter when placing an order. Please ensure that theproduct_idof each pricing plan is unique.product_name: Pricing plan name.credits: The number of credits purchased. If it is not a scenario for purchasing credits, it can be set to 0.valid_days: The validity period of the credits in days. Monthly credits can be set to30, and annual one-time credits can be set to365.group: The group to which the pricing plan belongs. Associated withnameinpricing.groups.
Please refer to the default pricing table configuration, modify the corresponding field content, and design the pricing table according to your project requirements.
Note: If your project supports multiple languages, please modify the pricing table configuration corresponding to each locale.
After selecting a pricing plan, the interface for requesting an order is /api/payment/checkout. Example request parameters:
{
  "product_id": "starter",
  "currency": "USD",
  "locale": "en",
  "payment_provider": "stripe",
  "metadata": {}
}product_id: Unique identifier of the pricing plan. The order interface locates the pricing plan based on this parameter.currency: Order currency. Can be selected by the user, default isUSD.locale: Order language. Pass the user's currently selected pagelocale. The order interface locates the pricing table configuration based on this parameter.payment_provider: Payment provider.metadata: Payment metadata. Custom parameters can be passed.
Note: After modifying the pricing table configuration, visit the
/pricingpage to view the new pricing table. Select a pricing plan to place an order. After successful payment, verify the payment record on the/settings/paymentspage, checking if the payment amount, currency, and billing cycle are consistent with the configured pricing plan. Check the credit issuance record on the/settings/creditspage, verifying if the credit amount and expiration time (payment time + valid days) are consistent with the configured pricing plan.
Configure Payment Callback
After the user selects a pricing plan and successfully places an order on the pricing table page, they will be redirected to the Stripe payment page. After successful payment, they will be redirected to the project's callback interface: /api/payment/callback.
In the callback interface, the order status will be updated based on the order number, and then redirected to the configured callbackUrl.
This configured callbackUrl is specified in the order interface: /api/payment/checkout:
const callbackUrl =
  paymentType === PaymentType.SUBSCRIPTION
    ? `${callbackBaseUrl}/settings/billing`
    : `${callbackBaseUrl}/settings/payments`;
According to the default configuration, if it is a one-time payment, it will eventually redirect to the /settings/payments page; if it is a subscription payment, it will eventually redirect to the /settings/billing page.
You can modify the redirect address after user payment completion according to project requirements.
Note: Payment callback is a synchronous redirect. If the user confirms payment on the Stripe payment page but closes the browser before the page redirects, failing to redirect to the project callback interface normally, the order status cannot be updated, and the user cannot see the paid order in the personal center. This situation is called:
Lost Order.
To avoid the Lost Order situation in payment callbacks, it is recommended to configure payment notifications in the Stripe backend when the project is online.
Configure Payment Notification
In the Stripe merchant backend, go to the Developers -> Webhooks page, click the Add destination button, and add a payment notification address.
-
Events fromselectYour account -
API versionselect2025-10-29.clover, which is the latest version tested so far. -
Eventsfilter by keywords and check the following items:
# Checkout completed
checkout.session.completed
# Payment succeeded
invoice.payment_succeeded
# Payment failed
invoice.payment_failed
# Subscription updated
customer.subscription.updated
# Subscription cancelled
customer.subscription.deleted-
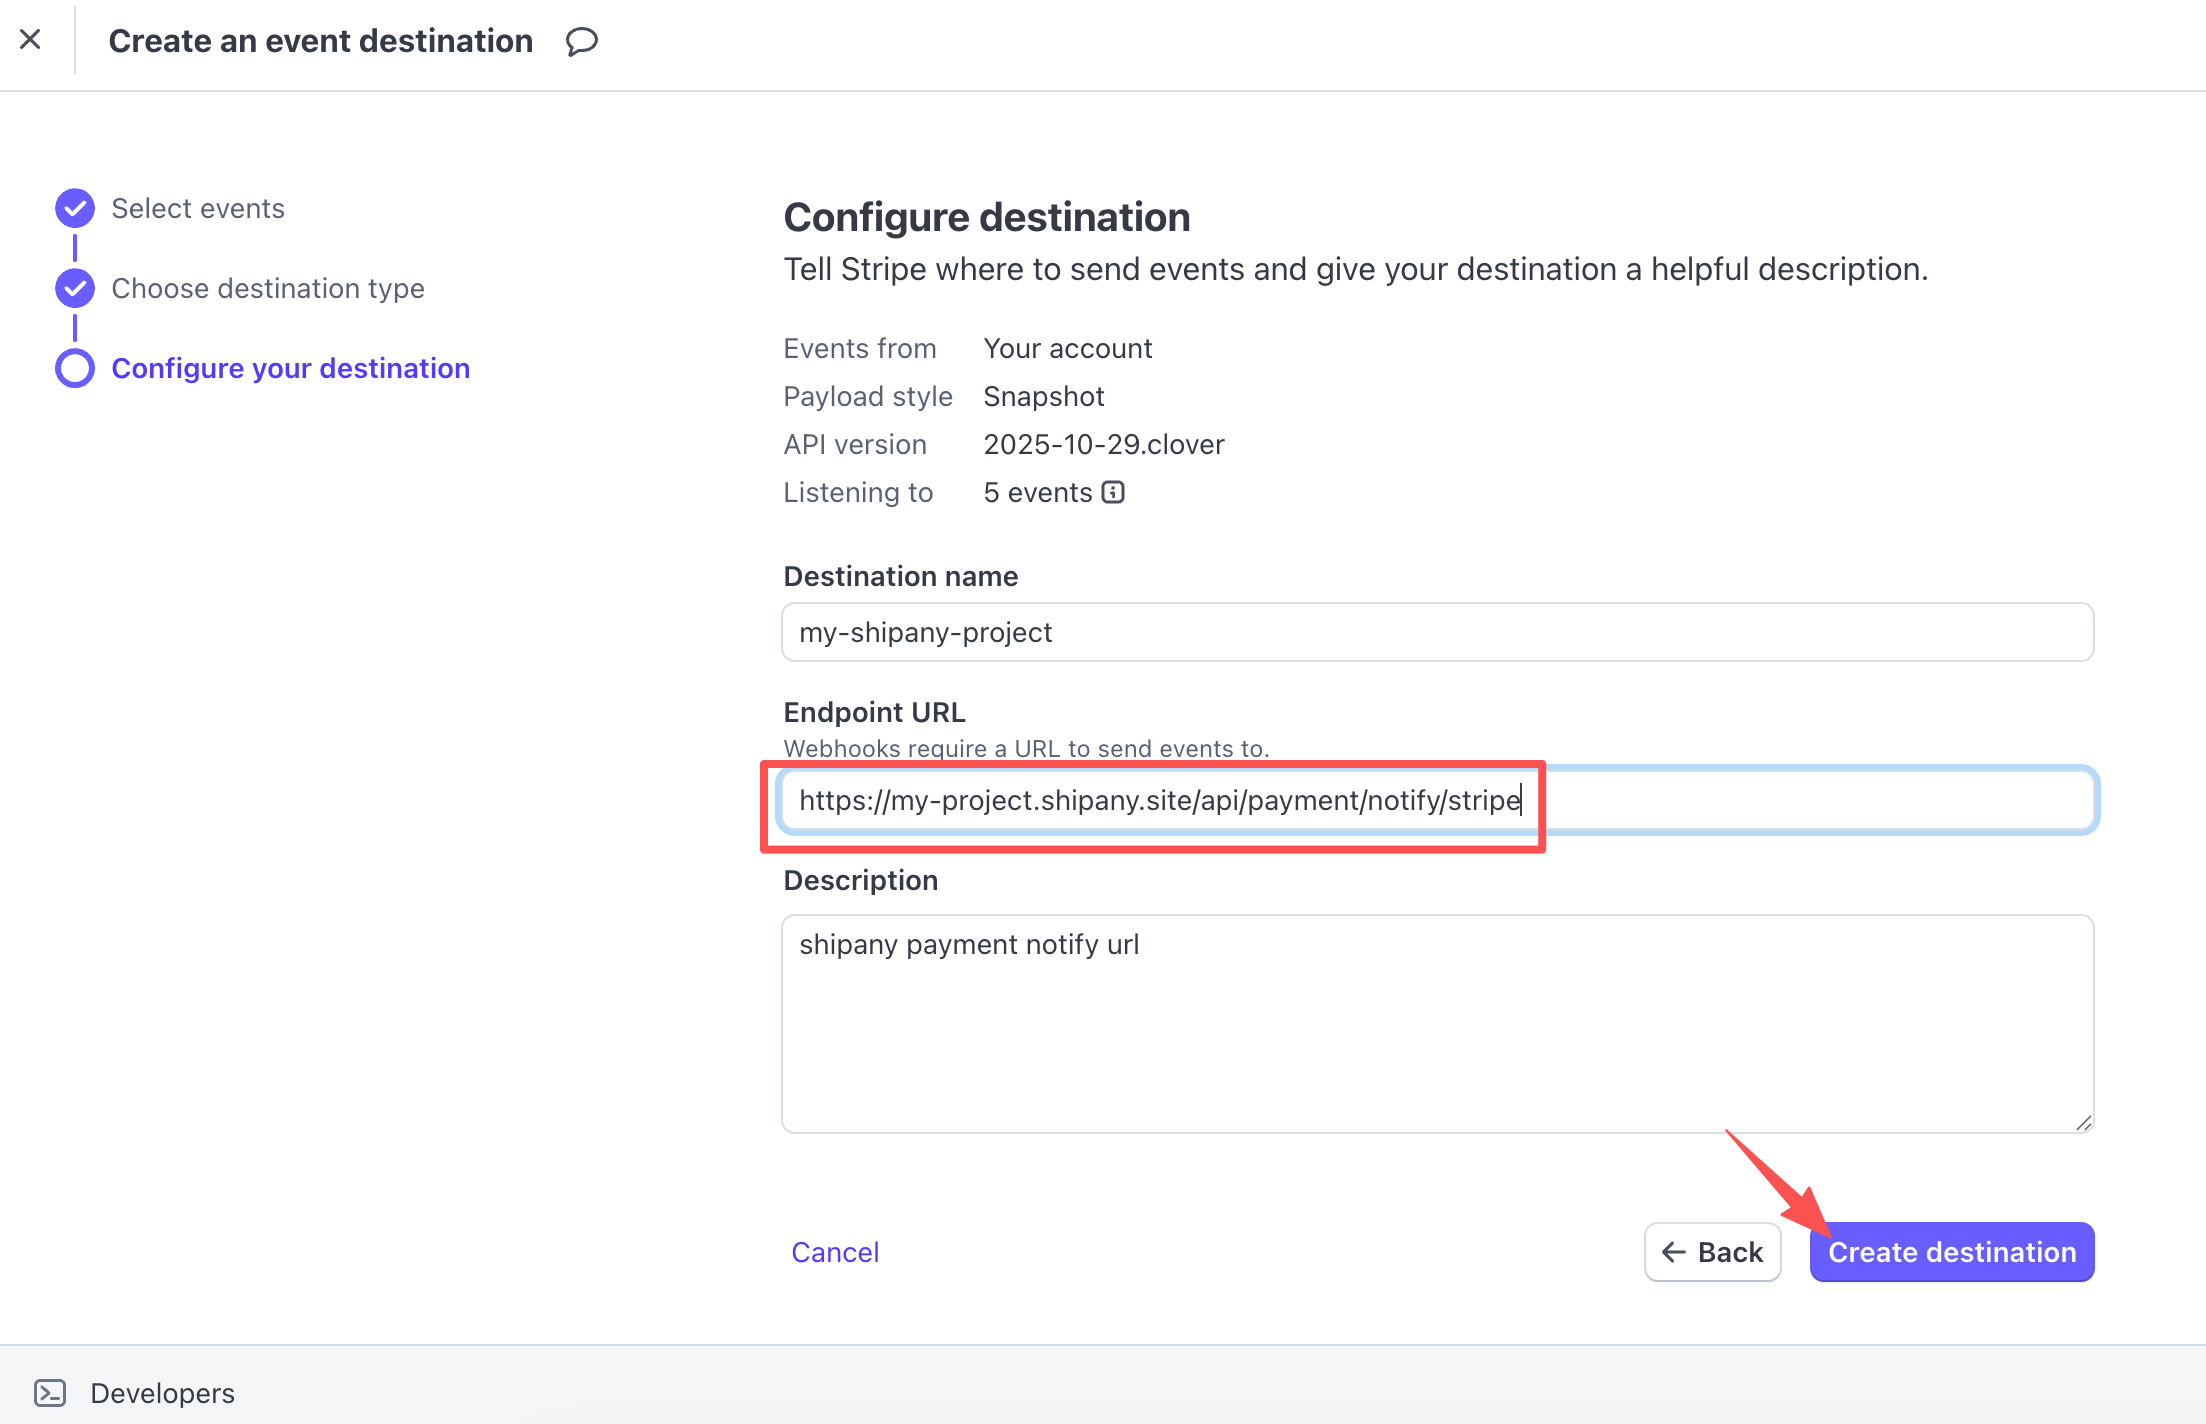
Destination typeselectWebhook endpoint -
Destination nameenter a configuration name, for your own reference, fill in anything. -
Endpoint URLenter the address to receive notifications. It must be a publicly accessiblehttpsaddress. The format is:
https://{your-domain.com}/api/payment/notify/stripeReplace {your-domain.com} with your project domain name, which can be a root domain or a subdomain.
Descriptionenter a description, for your own reference, fill in anything.
After filling in the configuration, click the Create destination button to add the payment notification address.
After creating the payment notification address, it will automatically jump to the details page of the payment notification address. Click the copy icon under Signing secret to copy the payment notification signing secret starting with whsec_.
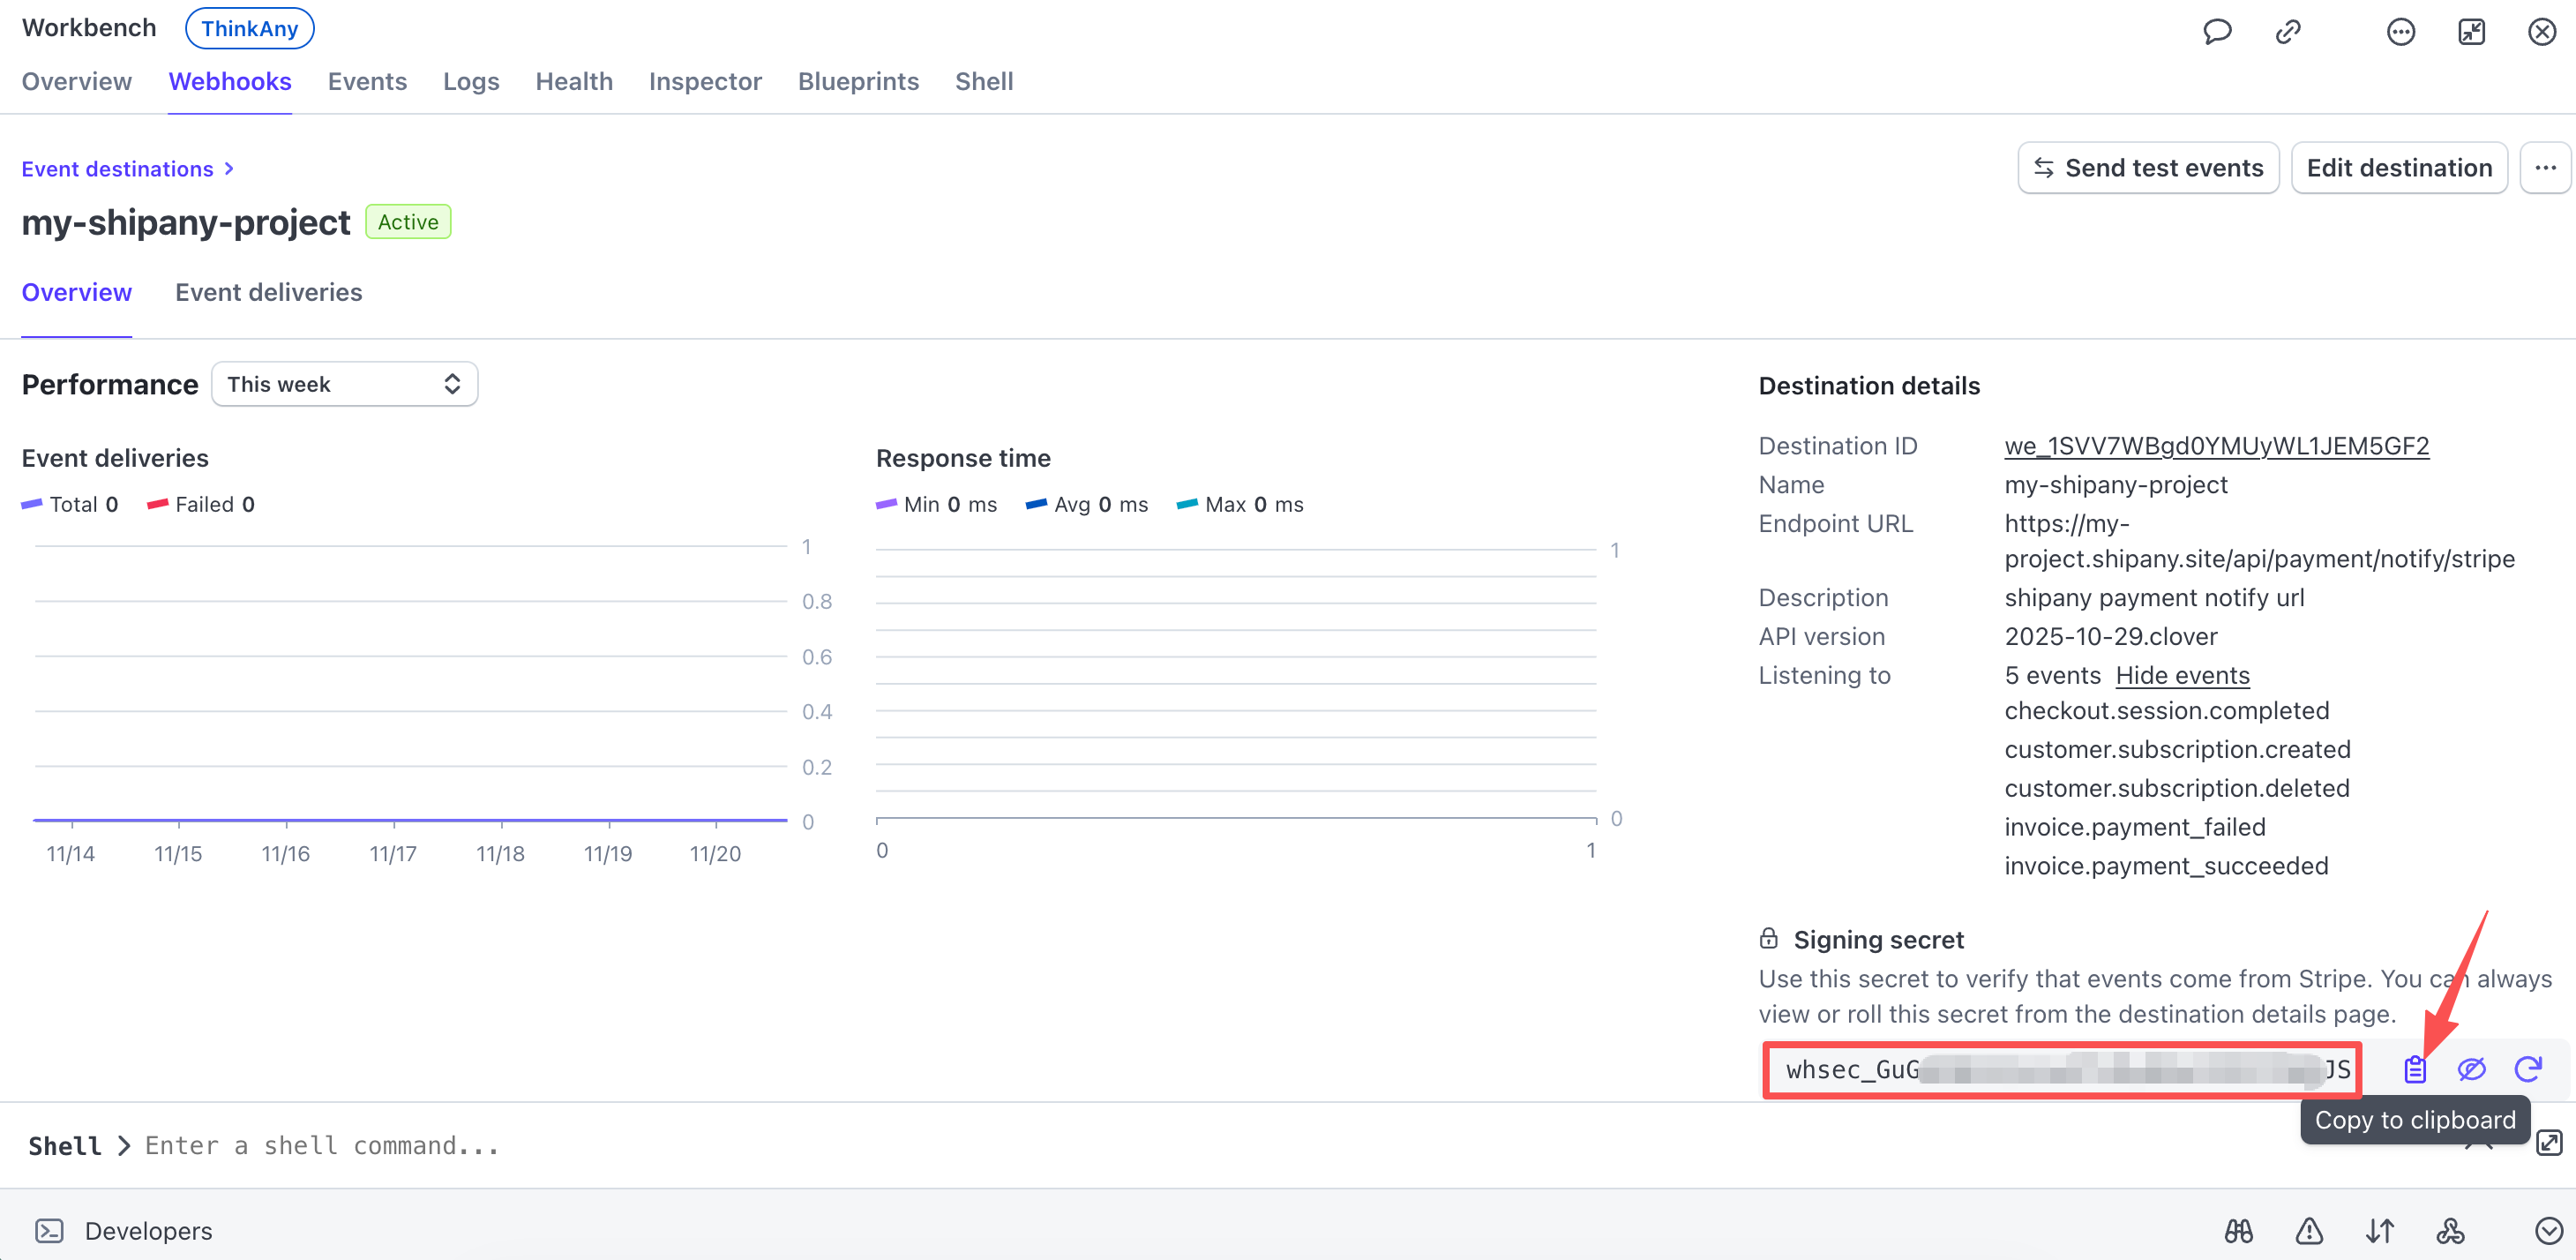
In the project management dashboard, go to the Settings -> Payment -> Stripe panel, and enter the payment notification signing secret copied in the previous step into the Stripe Signing Secret field.
Local Debugging of Payment Notification
When configuring payment notifications in the previous step, the filled Endpoint URL must be a publicly accessible https address.
Before the project is deployed online, it is necessary to debug locally first, receive payment notification content, and make necessary modifications and verifications.
Through Intranet Penetration, a public network address can be mapped to a local development machine. The following steps mainly demonstrate using ngrok to implement Intranet Penetration.
-
Visit the ngrok official website, register an account, and log in to the management backend.
-
On the Setup & Installation page of the management backend, select your operating system type and follow the instructions to install the
ngrokcommand-line tool.
For example, the installation command for MacOS is:
brew install ngrok- Configure
authtokento complete authentication
ngrok config add-authtoken {your-authtoken}Execute the following command to start the project's development server on the specified port.
pnpm dev --port 8080Execute the following command to start the ngrok proxy.
ngrok http 8080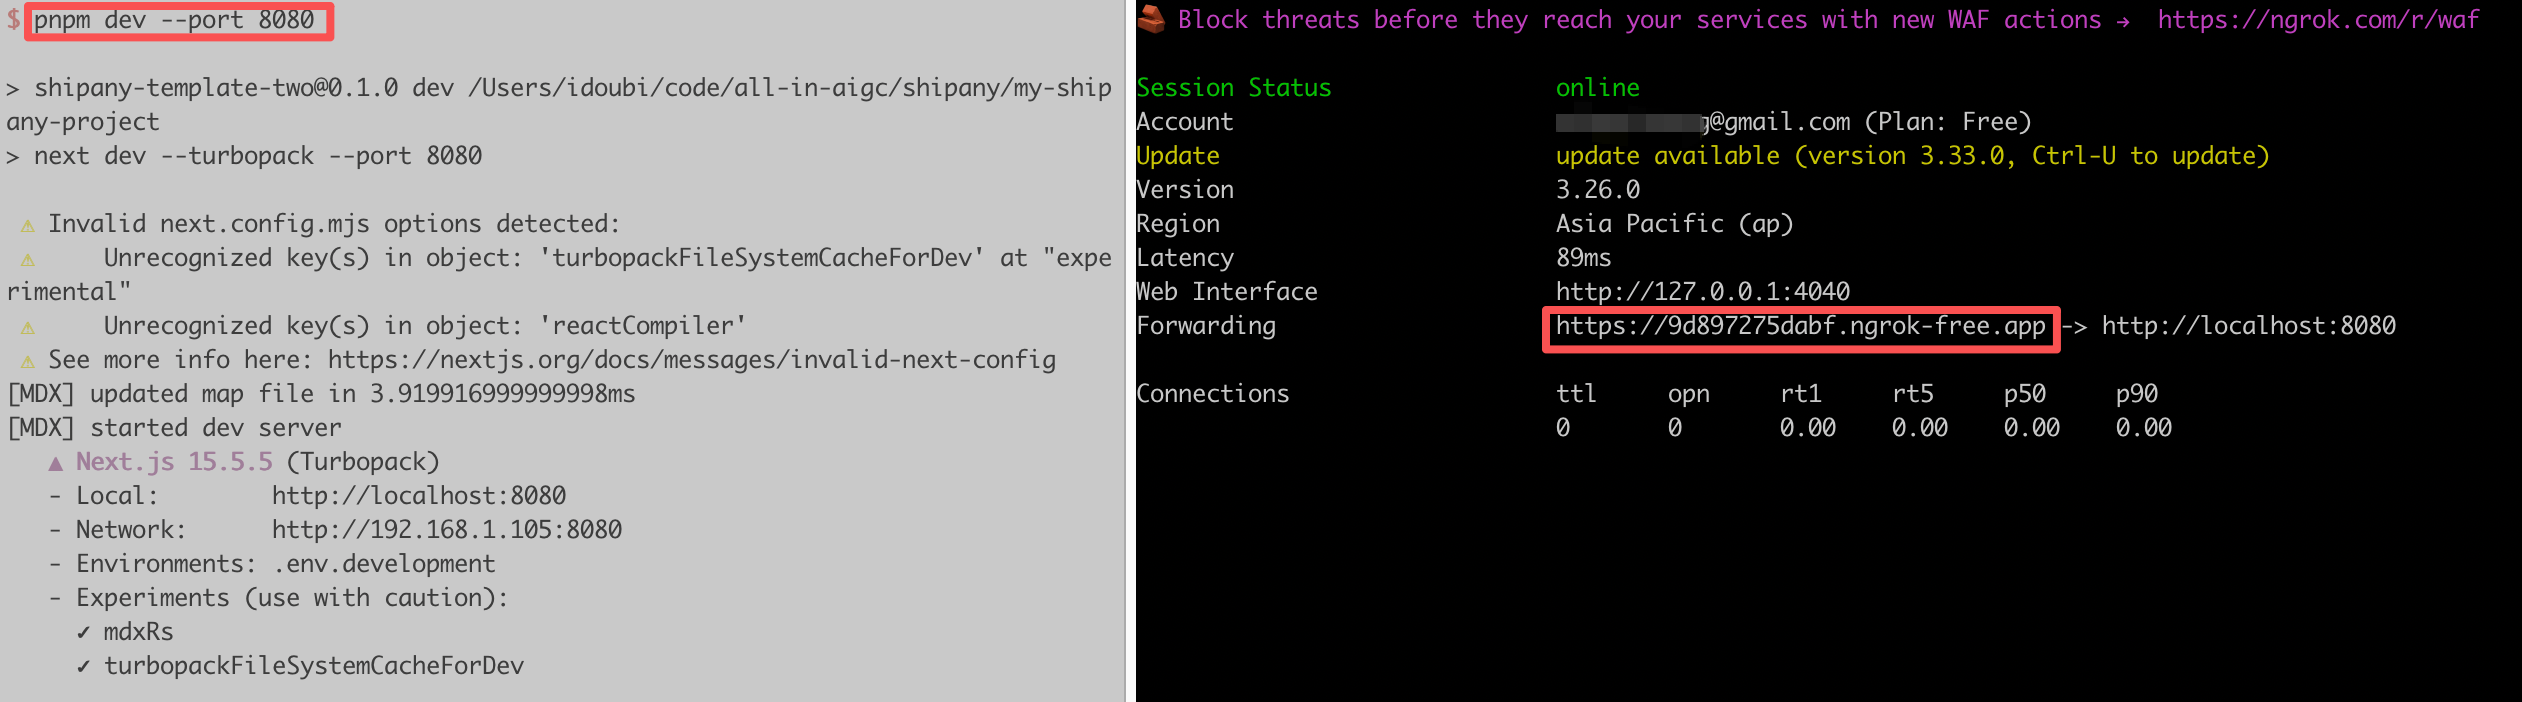
Return to the Configure Payment Notification step, copy the proxy address of ngrok, and fill in the Endpoint URL.
Example of configured Endpoint URL:
https://9d897275dabf.ngrok-free.app/api/payment/notify/stripeNote: Every time the
ngrok http {port}command is executed, a new proxy address will be generated, and theEndpoint URLneeds to be reconfigured in the Stripe backend. Please ensure that it is only configured during development and debugging, and do not use thengrokproxy address in the online environment.
After configuring the payment notification according to the above steps, select a pricing plan on the pricing table page to place an order, and you can receive Stripe payment notifications locally.
The default payment notification processing logic is in the src/app/api/payment/notify/[provider]/route.ts file. You can modify the corresponding logic according to project requirements.
Custom Payment Options
You can customize payment options according to project requirements based on the examples listed below.
Multi-currency Payment
When Designing Pricing Table, use the currency field in the pricing plan to specify the order currency. For example, Original price 199 USD, marked price 99 USD, the corresponding pricing plan configuration is:
{
  "amount": 9900,
  "currency": "USD",
  "price": "$99",
  "original_price": "$199"
}
If you want to allow users to select different currencies for ordering on the pricing table page, you can refer to the following configuration:
{
  "amount": 9900,
  "currency": "usd",
  "price": "$99",
  "original_price": "$199",
  "currencies": [
    {
      "currency": "cny",
      "amount": 69900,
      "price": "¥699",
      "original_price": "¥1399"
    }
  ]
}
After configuration, you can see that the pricing plan has an option to switch currencies. In the pricing plan configuration, the outer currency is the default currency, and the currency inside currencies is the switchable currency.
Note: The
currencyfield is case-insensitive, and theamountunit is: cents.

WeChat / Alipay Payment
Follow these steps to enable WeChat / Alipay payment in your project.
WeChat / Alipay PaymentIn the Stripe merchant backend, go to Settings -> Payments -> Payment methods -> Default to apply for WeChat Pay and Alipay. It needs to be submitted for review and can only be enabled after approval.

If you want to support WeChat / Alipay payment, the currency field in the pricing plan configuration must be cny.
For example, defaulting to RMB ordering, configuration reference:
{
  "amount": 69900,
  "currency": "cny",
  "price": "¥699",
  "original_price": "¥1399"
}
Defaulting to USD ordering, allowing switching to RMB payment, configuration reference:
{
  "amount": 9900,
  "currency": "usd",
  "price": "$99",
  "original_price": "$199",
  "currencies": [
    {
      "currency": "cny",
      "amount": 69900,
      "price": "¥699",
      "original_price": "¥1399"
    }
  ]
}After modifying the pricing plan configuration, you need to adjust the Stripe Payment Methods configuration in the management backend.
Check the payment options you want users to see when entering the Stripe payment page.
For example, if you only allow users to use WeChat Pay, check Wechat Pay and uncheck Card and Alipay.
Note: The payment methods checked here must be in the
Enabledstate in the Stripe merchant backend, otherwise an error will occur when placing an order.
